DIGITAL SCULPTURE
WEEK 1
We began by studying the anatomy of the skull. Some hey features to differentiate between a male and female skull are:
- Males have more protruding supraciliary arches and a more angled back forehead.
- Males also tend to have a more defined jaw line.
- Females tend to have smaller supraciliary arches and a forehead at more of a right angle.
- They also usually have softer jawlines.
Anatomy of the skull

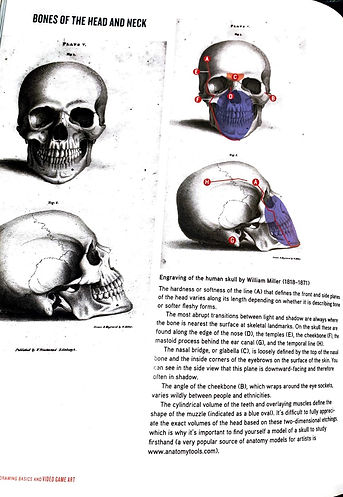
Here I have included a section from 'Drawing Basics and Video Game Art' by Chris Solarski which goes into some more detail about the structure of the human skull.
It shows all the key features to consider when drawing or modelling a human skull.
Here I did a quick study of the nose.
This was an in class study to learn the basic brushes and interface.

Practice 02 at the nose. Adding more definition and carving out the shapes to create shadows and structure. Adding muscle definition along the bridge and tip to highlight where the nose would move/wrinkle when snarling. Creating more hollowed out nostrils to give depth and become more realistic.

An exert from 'Drawing Basics and Video Game Art' by Chris Solarski describes how to use boxes to plan out the drawing of a nose.
It tells us how the nose bone stops at the top of the nose and the rest is mailable as it is is made of cartilage. It also shows where the muscles would be present when making facial expressions.
Anatomy of the head.

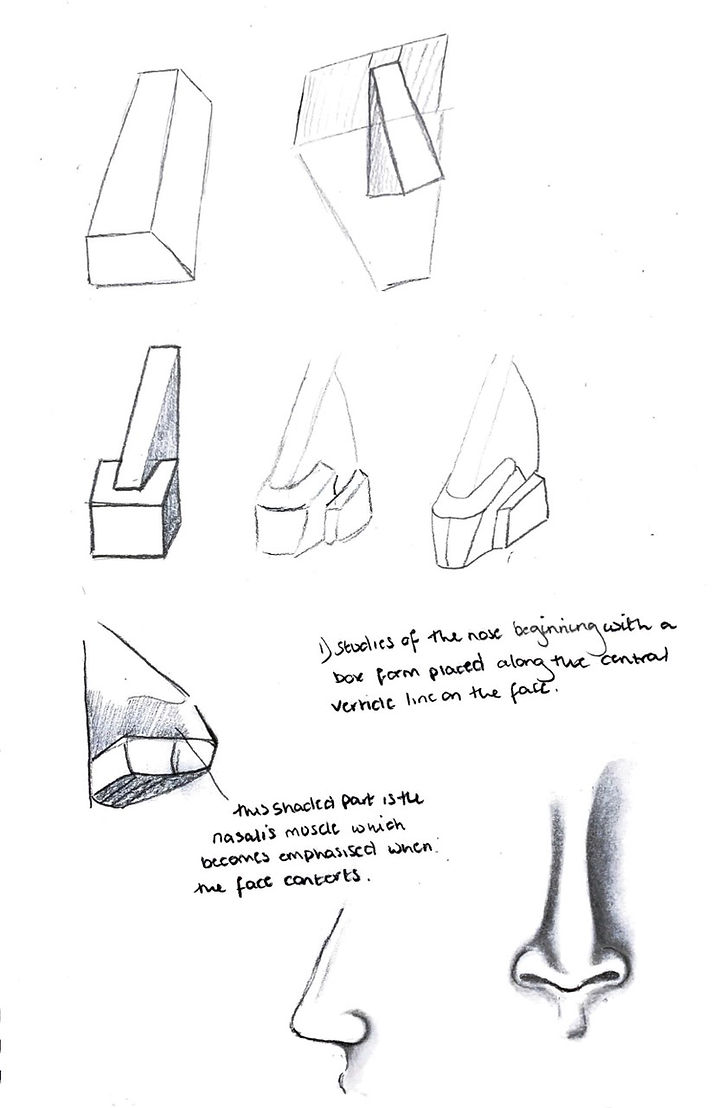
Here I followed the activities in 'Drawing Basics and Video Game Art' by Chris Solarski and created my own sketches to practice the anatomy of the head and facial features. I sketched various ways and positions of each in my sketch book by hand and scanned the pages to put on to this website.

Personal Study

My Sculpt
I did a quick attempt at the eye just to start visualising where the features would be when sculpting. Focusing on making the lids around the eye and learning how to use the move brush to curve the eyeball. I used the dam-standard brush to mark out where the iris and pupil would be just for reference.

WEEK 2
The cartilage in the nose is what makes up the majority of the nose.
The bone along the septum (columella-labial angle) is what determines the shape of the nose whether it is more turned up or down.
The parts around the nostrils under the lower lateral cartilages is made up of Alar fat and so is a lot softer and smoother.
.jpg)
.jpg)
Below are my sculpts of a nose in ZBrush adding more focus on the cartilage and individual parts of the nose as studied above. Adding in the Philtrum below to show where the nose would lead to the lips.


Process and Sketch-Fab of the Nose:
This diagram shows the cartilages of the nose and how to separate into sections.
My Sculpt 3
WEEK 3
This week's focus is on the mouth. Below shows the main parts of the mouth to be considered when sculpting.
.jpg)


Here shows the sections of the mouth when sketching.
Separating into shapes like this allows a better understanding of where the muscles will move when drawing facial expressions and defining age differences between characters/subjects.
Simplifying the lips into shapes allows me to plan what shape the lips will be and fit better into the overall face.

The teeth are not straight in the mouth but are in a curved formation and therefore teeth will overlap and be out of sight when smiling.
Remembering this when sketching or sculpting will make the teeth and mouth more realistic. The upper incisors are 1/4 bigger than the lower incisors. When smiling the smile reaches the canines typically.
My Sculpt

Here are my first attempts at sculpting the lips. The jaw is not defined enough and the bottom lip too big.

I also needed to pull the cheeks out to make a more rounded bite.
Sculpt 2

Here I adjusted the parts that needed fixed. Making the bite wider and more rounded, making the lips more the same size and defining the chin and edges of the lips.

Below shows the sculpting process in ZBrush.
Personal Sketches
Lips Study:
These sketches show the mouth and teeth in various positions such as pursed lips, closed mouth and open.
I sketched these to practice positioning the lips in different ways and drawing teeth based off the anatomy discussed in the above notes.

WEEK 4
Personal Sketches
Ear Study:
I sketched the process of drawing an ear step by step to show the key features and where the shadows would fall. Starting with a rectangle to plan the size of the ear makes filling in the outline a lot easier.


Additional research:

Anatomy of the Ear:
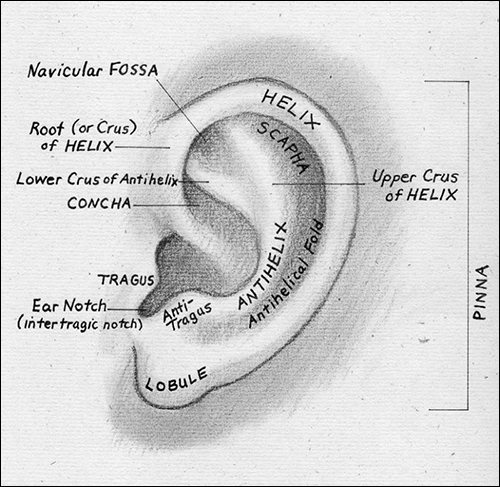


This week focuses on the ear. The ear is shaped like a funnel to 'funnel' sound into it. The shape of the ear follows the jawline and does not sit flat on the side of the head.

Below are my sculpts of the ear based off the anatomy learned I began by creating a mask the pulling the ear shape out to create the 'funnel' shape. Then using the standard brush, I built up the ear around and on top of this section. Using the reverse standard brush to carve in the ear hole and anti-helix.
My Sculpt
Below is my sculpt of an ear with and without the key features labelled:
Below I started a new sculpt and made another ear. I completed this one faster and was able to plot the anatomy a lot easier after modelling the first one.

Sculpt 2

Tubercle
Helix
Anti-Helix
Tragus
Anti-Tragus
Inferior Crus
Superior Crus
Triangular Fossa
Lobe
Intertragic Notch
MY SCULPT


The reference for this ear had a different structure than the previous as can be seen in the images.
WEEK 5
Personal Sketches
Eye Study:
I sketched out the process of drawing an eye from line work to shading. This will help when sculpting as I can see the main frontal features, shapes and shading points.


Anatomy of the Eye:


My Sculpt


Sculpt 2
Sculpt 3


WEEK 7
This week I focused of developing the eyeball in Maya adding bump maps and texture materials. I also used Maya to add transparency as well. I started by making the Iris by halving a sphere, indenting the surface using the extrude tool and adding both the Iris bump map and material.

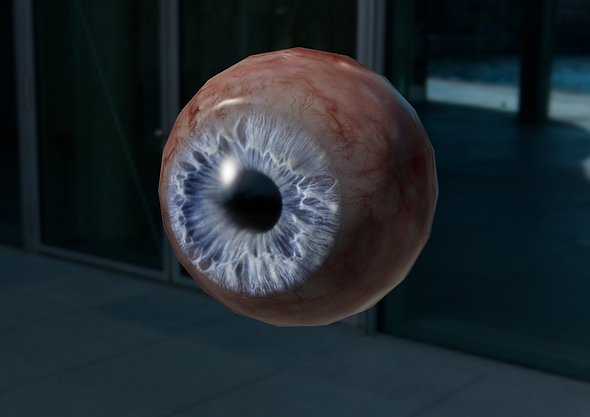

I then made the sclera which is the white and veiny part of the eyeball. This was made by overlaying a slightly larger sphere over the top of the iris and making the front half transparent using the 'ramp' tool.
I then used the same process for adding the material as I used for the Iris.
I noticed the eye didn't have a defined darkened edge where the sclera and iris cross over. To correct this I went back and adjusted the size of the texture on the iris to make it smaller, then adjusted the ramp.

As seen below the iris now has the darkened ring lining it which creates a more realistic transition.

Render View:

WEEK 8
Alpha Textures
Below are two examples of Alpha textures that can be applied in Zbrush to add texture to a model. These can add realistic looking pores, scales and scars etc. Using the DragRect tool allows me to place the alpha where I want it on the model. The alphas must be applied in high resolution for it to be effective.


Here shows the DragRect tool and the chosen Alpha as well as the application.


A1 Research
Fae (or Faires) originated from European folklore as mythical creatures. Commonly believed to be small innocent creatures when in fact were described as vicious, dark and monstrous. They were described as having humanoid features in various shapes and sizes and despite being cruel, were also beautiful. In modern renditions of the creatures, they have taken the appearance of demon-like creatures with wings and horns. Pale skin, black eyes and nature colored hair are common descriptions with mostly human features unlike the typical demon description which were more creature like.
Mood board
.jpg)
.jpeg)


Concept Sketches
Here I quickly drew some basic sketches to plot out the features I wanted and the basic details of the face.
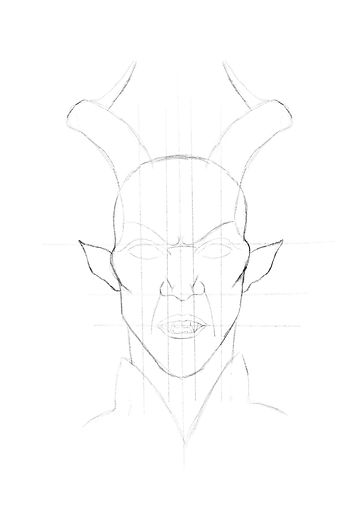


Development
The Head and Horns:
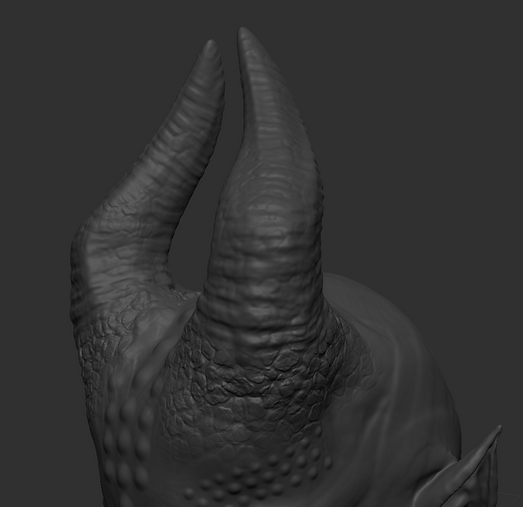
For the horns a began by applying two cones to the top of the forehead thinking it would be easier to sculpt on top of the geometry.
After a few attempts I discovered that the clay build up brush did not take well to the shape and would deform in strange ways.
Because of this I decided to delete the geometry and use the clay build up to create the horn shape instead.
Though a few problems with deforming still arose, overall, this method achieved a much better result and allowed me to build more texture.


To begin sculpting the face I started with making the cheekbones very pronounced and sharp. Then I changed the shape of the jaw and chin to make it longer and more angular as I wanted slightly more feminine characteristics on these areas. This makes the face look sharper and eviler looking in my opinion.
I plotted out where the arch of the eyebrows would be by sculpting sweeping motions upwards instead of arched over, this was to add to the angular look of the face and will eventually develop into more of a scowl.
I then created a nose which I wanted to be fairly triangular and symmetrical to then be manipulated into facial expressions. I used the standard and dam standard brushes instead of the clay build up for a smoother look.
Finally, I quickly shaped the ears using the move tool and the standard brush to arch the ear into a point.


Eye Sockets and starting the ears:


Next, I focused on plotting out the details of the ears and around the eyes.
For the ears I used the standard brush for a smoother application to plan out where the main features of the ear will be. This took some thinking about as I wanted the ears to be pointed therefore the typically anatomy would look slightly different. During this process I forgot to turn symmetry back on and only realised halfway through meaning the ears were at different stages of development. However, because this was just the initial planning stage it wasn't too much of an issue because I knew I would be going back over both ears to build up thickness and detail.
I decided to extend the forehead after feedback in class to make it more masculine. Making it longer and more sloped back is more typical in males, so I made adjustments accordingly.
Here I started to focus on the eye sockets and building up the shape of the brow. I wanted a very dramatic brow with more pointed/sharp cheekbones.
I sculpted the brow to be in a frown/scowl expression as I felt it added to the characters personality. This meant sculpting a very thick arched brow and plenty of wrinkles around the bridge of the nose and forehead.
I also added the under-eye fat and wrinkles to make the character appear older and more aggressive. It also highlights the sharper cheekbones and balances the proportions.
I added two spheres to temporarily be eyeballs so I had something to sculpt around.
Finally, I added very defined nasal labial folds from the nostrils to where the mouth will be. This will help when sculpting the mouth into a scowl expression later on.


The Lips
The lips I started off by using the DamStandard brush to draw in the parting between the upper and lower lips, then I used the Pinch brush to create the shape of the Vermillion borders on both the upper and lower lips. Then I used the Claybuild up and Smooth brushes to create volume on the lips, the three pads on the upper and two on the lower. Finally I used Damstandard and Pinch brushes to make the Philtrum.
The Lips
Since I had already created the Marionette lines previously, it made planning the size of the lips easier as I just needed to match up the corner of the lips to where the lines finished. I made sure to rotate frequently when building up the lips so that the upper lip was protruding out slightly more than the lower as is most common.
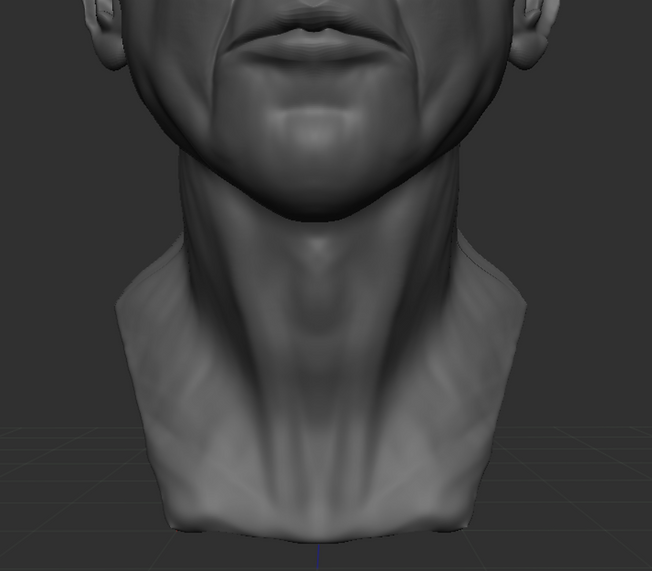
The Neck
For the neck I used the Claybuild up and Smooth brushes to create the strong lines of the neck. Even though I knew I wanted to add clothing later on, I wanted to build out the neck muscles to show underneath the clothing. Because I sculpted a male character I gave him an Adams Apple and made the neck slightly wider.
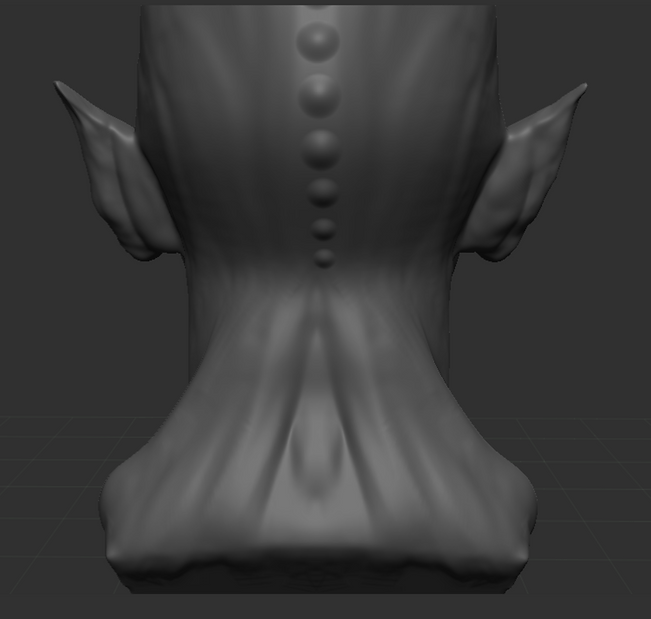
The Back
At the back of the neck, into the top of the back I wanted my character to appear strong and toned but not overly muscular. I knew that because he has horns that would weight down his head, strong neck/back muscles would be needed. I created the sweeping lines using the Claybuild up brush to bring definition to the neck and attach the lines of muscle to the back of the head for stability.

The Eyebrows
I wanted my character to have strong eyebrows to enhance his scowling expression. For this I used the Damstandard brush, both normally and inverted, to brush hair like strokes to the brow bone. I made sure to direct each of the hair stroke in different directions, following the same hair pattern as typical eyebrows.

The Ears
I developed on top of the ear sculpting I had done previously and focused on adding more details. I stuck to typical ear anatomy but adjusted the top of the ear to accommodate the pointed shape. I also focused more on behind the ears to give the typical trumpet shape and smooth exterior.
Skin Scarification
I used circular raised spots to add decorative markings on to the skin, mainly on the head and cheekbones in patterned lines.


Skin Texture
I used an Alpha texture to add skin pores. I applied this using the Dragrect brush all over the skin.

Clothing
For the clothing I wanted to create a high necked tunic with some sort of leather armor/protection across the shoulders, back and chest. To create this I first masked out the shape of the tunic and used the Extract method at around 0.04mm thickness. I smoothed out the edges and used to move tool to place the neck of the material where I wanted it. I then drew another mask on top of the extracted tunic, covering the shoulders, back and chest. I extracted this mask separately to create the armor style clothing. I used the smooth tool again to round the edges and the move tool to create a different shape that curved up off the shoulders.

Clothing Texture
To apply texture to the clothes I first used a Textured brush to create the leather look of the shoulder plates, I applied this with the Standard brush all over the layer. I then used the Damstandard brush to carve out scratches and grooves into the leather to give it a worn look and more character.
For the tunic I used the Damstandard brush on a low intensity to create dimples and creases in the fabric around the collar to give it less of a ridged look and to make it look more worn. I then used the Layer brush to create the folds in the arms, chest and back along with the Damstandard brush to really carve out the folds of material. I wanted to material to look more intricate yet durable like a light armor worn underneath.


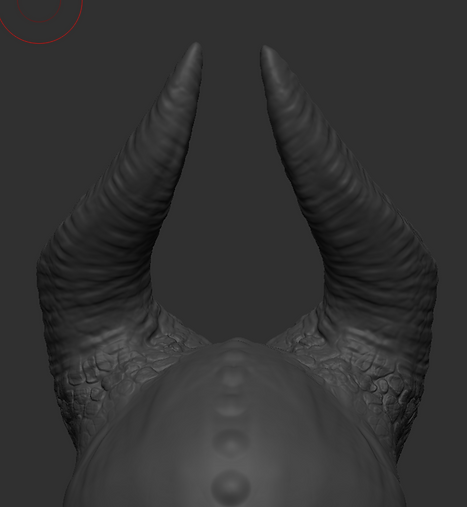
The Horns Texture
I began to apply a rough scale like texture to the horns with the texture being larger at the base and getting smaller the further up the horns. However, I encountered a problem which meant the sculpt was warping and created stretched surfaces meaning the textures could not be applied. To combat this I had to turn on Dynamesh and smooth the models surface in Dynamesh mode. I then switched Dynamesh off to continue to texture.


The Lips
I decided to add some more detail to the lips as they looked too smooth. I used the DamStandard brush to add some grooves and skin texture to make them look more realistic and rough.


Horn Details
Finally I added some details to the horns to make them more textured and rough. I used two different Alphas, one for a brick like pattern for round the base and lightly up the horn, then a ridged one to make the ridged line wrapping round the horns, decreasing in intensity the higher up I went.

Low-Poly
Once all the sculpting and details were complete I needed to reduce the PolyCount of each of the models parts so that I was ready to be textured (painted on). I ZRemeshed a duplicated version, made a high and low subdivision and UV Unwrapped and Projected the original version on to the low-poly version for each part of the sculpt. Then I saved the low-poly version separately ready to texture.
Texture
For the texturing I decided to use the paint technique within ZBrush. Using a variety of brushes, Alphas and colours.


Skin
For the skin I wanted a pale white looking base where I could then layer on top of. I infilled colour using an off-white grey toned base colour for the whole head and neck. I then added a grey speckling across the top of the white as skin discoloration giving the character more of a grey gaunt look. Finally I added pink tones to the areas that would be naturally pinker, around the nose, eyes, lips and ears.
Eyes
Around the eyes I wanted a charcoal black makeup look so I created smudged black circles around the eyes. I felt this made the character more menacing and warrior like. I also added blue veins around the eyes that stand out against the pale skin.
Lips & Paint
The lips I added more pink tones too, focusing on around the edges and along the inner line of the lip. I didn't want to make the lips too pink as it would clash with the paleness of the face. I also added red war markings to further enhance the warrior likeness. I decided on red as red is a symbol of warning and danger which suited the character I had in mind.
Ears
The ears also required more pink tones as naturally ears are warmer coloured compared to the rest of the face. I added pink specifically along the tip and outer edges, the inner section and along any veins where there is more blood flow. The veins I used the same principles as the eyes using the Dragrect tool the apply Alpha 60 to the areas I felt where correct. I kept the colouring quite bright blue for contrast.
Back of the Head
Here I applied more of the grey skin discoloration to imply some ageing as well as faint veins running up from the neck through the base of the head. I also applied more veins to the back of the ears as typically they are more predominant here. I added blue tints around the raised bumps to signify stretched skin and perhaps bruising.

Horns
For the horns I had already sculped a lot of the bumps and ridges so that when I came to texture, the roughness was already in place.
I applied various shades of brown and grey in layers across the horns, starting with a darker base and getting lighter the further up the horn with the tips being the lightest. I wanted the gradient to seem natural and define where the horns separate from the rest of the head.
I also tried to apply darker tones in between the ridges of the horns to deepen them and show the variation in depth and height.


Clothes
For the outer armor I applied deep blacks and browns as bases layers and then added lighter tones to the top to show wearing and discoloration from use.
I deepened the scratches and grooves made to the leather with darker colours.
I applied dirt by using the Dragrect and Alpha brush 08 in a light brown colour in patches across the armor.
For the under shirt I mainly used black with some dark brown marks to show worn parts (around the collar). I applied some dirt using the same process as above around the collar edges and sleeves.
The back the clothes where kept the same as the front for continuity. With just a little more wearing along the top of the armor where rain would likely hit or a cloak would rub.


Side View

1/4 View

Close Up

Front View

First Render Images in Maya
.jpg)


These images were practice renders as I Tried to get lighting and render settings correct. As you can see, the first three images, the quality is not high enough for a final render and in the second set of images the lighting is too dark. It was useful to see how the sculpt reacted in Maya and how much more realistic the results became.
Assignment 02
Final Renders
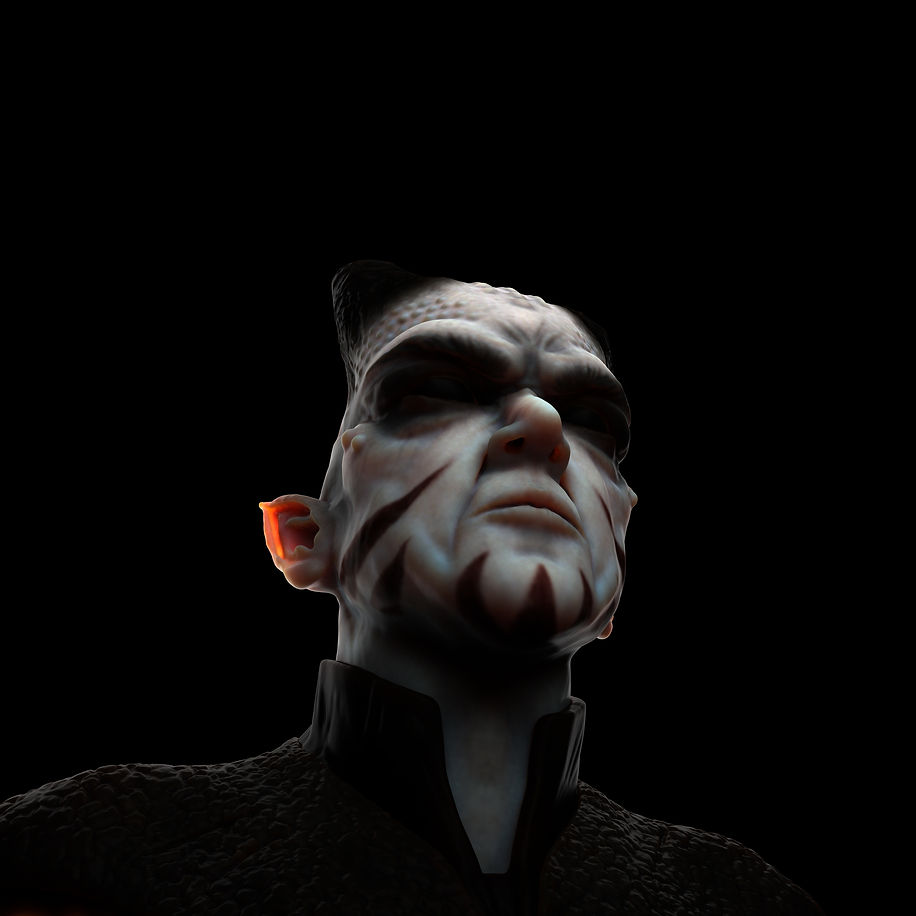
Below are my final Maya renders for Assignment 02, Villain Sculpt. I added a three point lighting set up for some atmospheric moody shadows and sub-surface scattering. I used various camera angles to show the different sides of the model. On reflection the only part I feel I would change is that the skin pores/details somehow got lost in Maya even though they were present in ZBrush, I feel that if I were to re-do this model again I would make the pores more pronounced so they would not get lost in the Maya render. Other than this detail I am very happy with how the model turned out and learned a lot along the way.




FACS (Facial Animation Coding)
Below are my animated facial expressions for my Villain Sculpt. I did a Variety of expressions as shown in the video. I have also included three screenshots of the best expressions, Sadness, Anger and Happiness. I made these FACS in ZBrush first using the layers application and then exported into Maya to put into an animation sequence where I keyframed each expression.

Sadness

Anger

Happiness
FACS in ZBrush:

Animating FACS in Maya:

END OF ASSIGNMENT 02 WORK
WEEK 9
Fat
The two many types of fat are:
-Subcutaneous fat
(Under the skin)
It is all over the body and as someone gains weight it gathers in some places more than others.
It forms compartments within the superficial layer.
-Structural fat pads
Usually, deeper as provided protection.
Age makes the fat pads separate, reduce and sag.
Orbital fat pads are to protect the eyes.
There are 2 on top and 3 on the bottom.
The nasal fat pads are on the medial border.


Colour


Skin colour following the typical colour theory for a face. Yellower tones in the first third, red tones in the second and grey tones in the third.

Applying veins and beauty marks. Using the dragrect tool to apply the alpha I used two different alphas in different colours. Blue lines for veins and brown dots for the beauty marks.

Texture
Here I learned how to apply a texture without painting the colours on by hand. Instead, I imported a photo of a mouth into Zbrush texture tab and spotlight this image onto the model. First image is the photo used and the second image is the final look on the model.


WEEK 10
The Neck
This week we focused on the anatomy of the neck and upper back muscles.
Clavicle

Trapezius

Platysma

Boney Landmarks

Sternocleidomastoid

Adams Apple

WEEK 12
FACS - Facial Animation Coding System.

WEEK 13
XGen
I experimented with getting XGen to generate hair in Maya to understand the basic principles. Below are some images of a my generated hair.
Primitives Box:

Modifiers Box:

With Lambert Material:

With Arnold AiStandardHair Material:

With Arnold AiStandardHair Material and Lights:


Directions for setting up Hair in XGen:
Set project and accept in project window
Always save regularly
Only accepts lambert textures
Xgen in windows workspaces
Create New description
Collection is the name
Description (add ie long hair)
Placing and shaping guides click on
Add or move guide
Click on model
Control using scale, rotate tools
XGen doesn’t like undo
Sculpt guides
Can then move guide around into position
Click mirror tool with guide selected if needed
Click the eye (XGen preview) to view the hair
Increase density for thickness
Modifier count, changes the subdivisions
Select guides, rebuild, smooths the subdivisions
Length leave at 1
Width, reduce the width to make strands thinner
Use antialiasing to view the realistic version
Width ramp, is the tapering of the ends
Go to modifiers tab
Add new modifier
Clumping
Will come up with warning just tells us we don’t have a map.
Click set up maps
Generate clumping map
Increase density
Guide
Save
Go to the mask
Can reduce or increase how many strands clump
Clump effect does similar thing
Noise effect, effects the amount of noise on the guides/clumps. Not individual hairs
Curl effect, use the graph to add waves
Add second clumping
Set up maps
Generate (not guide)
Increase density
Save
Add noise modifier
Can adjust frequency and magnitude
(On the graphs left to right is root to tip)
Add cut modifier
Allows us to adjust how long or short hair is
Can do this on the amount section
Add coil modifier
Adds spirals to the hair
Radius adjusts how big the coils are
Add noise modifier
Increase magnitude
Type stray() into the mask section
Descriptions
Set stray percentage
Will apply the mask to whatever percentage of hair you chose
This give the more realistic look of stray hairs
If you want to render in Arnold you have to assign new material (aistandard hair)
Then can change the colour ect and render in Arnold
In primitives tab
Guide animation
use animation
Create hair system
Apply
This creates dynamic curves
Attach hair system
Would have to do an alembic cache to render out
This is a way of storing animations
WEEK 14
XGen Part 2
Applying hair into a hair style. Also looking at applying eyelashes and facial hair. The notes below are the instructions used to generate these styles in both Zbrush and Maya for my future reference.
My Notes:
Head hair and Facial Hair:
Creating guides in Maya
Duplicate model and rename one hair
Make sure to work on hair model
Use clay build up to build up a hair style
Make folder on desktop or wherever you need
Save project
( Zplugin
Zremaster
Unwrap
For both models to get uv maps )
Go on to the original model and give more polys
Click export as obj
(This is the one without the hair)
Select model with hair
Export as obj
Save again
Go into maya
Set project
Crest default workspace
Project window
Accept
Then save scene
Import
Workspace root
Obj
Bring in all folders (eyes, original head and hair)
Scale up
Modify
Freeze transformations
Reset transformations
Hide original head in outliner
Windows
Workspace
XGen
Select hair model
Generate
Make paintable
( Extra- Click little camera
Focal length change to 100m lense )
Paint effects tool
Draws a line on the model it will follow the shape of the model
Draw your lines in the direction the hair will go
The more guides the better the effect on the hair
Select the strokes in the outliner
Modify
Convert
Paint effects to curves
Save projects
Delete strokes in outliner
Hide the models so only strokes show
Click drag select all strokes
Edit
Group
Delete previous stroke groups
Bring back the original model head
Paint selection tool
Turn on symmetry
Paint the polygons I want to be hair to crest a mask
Go a little bit over the stroke lines
XGen
Create new description
Collection is the name
Description is “hair” or type of hair
Placing and shaping Guides
Create
Utilities
Curves to guides
Select all curves in outliner
Add guides
Primitives
Density up
Width reduce
Width ramp reduce at end
Press antialiasing
Increase modifier cv count
Select guides in outliner
Rebuild
Select main head
Object mode
New material
Lambert
XGen
Primitives
Click downward triangle next to mask
Create map
Call it density mask
Map resolution up to 20
Start colour Change to black
Shading
Wireframe unshaded
Change drawing colour to white
Draw on where hair needs to go
Press save icon
Will only then generate hair where map was
You would then sculpt the guides better by hand moving them
Modifier
Add modifier
Clumping
Set up maps
Density of around 20
Guide
Save
Reduce clumping modifier under mask setting
Can also use the density mask process to make a length map.
Follow similar process as XGen 1 lesson to tweak and add different modifiers.
(If it crashes make sure to reset project)
Creating guides in zbrush
Go to original head model
Duplicate
Rename as density
On this model
Change material to skin shade material
Change colour to all black
Colour fill object to black
Switch colour to white and draw on where the eyelashes and eyebrows or beard would be
Use smooth tool to smooth edges of texture
Do the same for the hair
Use gradient colour to give a fade
Zplugin
Multimap exporter
Texture from poly paint
Create all maps
Go to maya
File import obj
Crest new description (usual)
Add guides
Sculpt guides downward for beard
Place in key areas (upper lip, cheeks and chin)
Interplate inbetween (generates more guides automatically for you in same directions)
Select guides in outliners
Mirror guides
View hair
Primitives
Go to the density mask
Create map
Create
Save icon
Hypershade window
Textures
File 1
Image
Choose density map
Save icon
This applies mask
Creat map for length
Generate
Save
Hypershade
Textures
File 2
Image name
Select map
Close and save
Then adjust modifiers and primitives as usual


In Class demonstration of creating a beard with XGen:
Creating Lashes:
Maya
Set project
Create default workspace
ZBrush
Duplicate head model
Subdivide (52,000 polys in example)
Zplugin
Uvmaster
Unwrap
Rename “lashes”
Export “lashes” to new folder as obj
Export the eyes to same folder as obj
Maya
Import
Workspace route
Obj
Import eyes and “lashes” head
Scale up
Change focal length if needed for camera
Turn on symmetry
Paint select
Make sure in face mode
Make brush smaller (B)
Paint along the lash line to turn polygons orange
XGen
Creat new description
Call it lashes
(Keep top and bottom lashes separate)
Place guides
Add guide
And click on lash line to place at each end of lid
Move guide into a more curled shape and position
Then when middle is placed it will inherit the shape of the others
Press control click to move the lash
Select all guides
(Channel box, create layer, R means it is not being worked on. Separates sections to work on)
Then go through and size the lashes and make more realistic
Press mirror
Now appears on both sides
View
Primitives
Increase/decrease density
Increase/decrease thickness
Taper ends with width ramp
Select guides
Rebuild
About 15
Turn on antialiasing
Hide guides
Save as
Density map, create map
20 resolution
Black
Create
Shading
Wireframe unshaded
Change colour to white in tool settings
Paint a thinner lash line along the eye
Change colour to black to Erase any mistakes
Use gradient shades to make tapered lashes
Press save icon
Turn off wireframe unshaded
Click off the tool
Lashes should now appear in a thinner line
Modifiers
Add clumping
Setups maps
Guide
Increase density
Save
Bring down clumping under clumping modifier (or use the script off blackboard to create the drag bar)
Apply
Add another clumping
Generate
Increase density
Apply
Add cut modifier
Adjust length how you like
Add noise modifier
Adjust how you like
Top lashes should now be on
Follow same process as “XGen hair” to render out (aistandardHair)

